1.11. Adding Resources to Your MedeA Installation
| download: | pdf |
|---|
The first Installation from the ISO guides you to create a working system on your computer: the MedeA front end, the JobServer, and TaskServer are all installed and working together. This is perfect for learning to use the interface and run your first calculations.
Adding resources to your MedeA installations can be accomplished in many different ways, and there are plenty of solutions. The following section covers most cases: Adding another front end, migrating to a bigger repository for Jobs, and adding more computing power.
The clear separation into three tiers allows for adding or changing components much impact on ongoing calculations, as a quick guideline, only the tier and its neighbor are affected.
1.11.1. Adding Another Front End
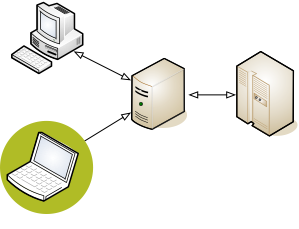
Starting with a simple and common procedure, to add second front end on a laptop to access the already finished calculations on the existing MedeA installation. There is no need for a complete installation, as the laptop is frequently turned on and off.
| GUI | JobServer | TaskServer |
Install from ISO:
MedeA + SQL
+ databases
|
||
Get new license:
C:/MD/2.0/license.txt
|
||
Connect to JobServer:
Edit MedeA Preferences
|
Name IP-address | |
Copy environment
settings
~/ MedeA 2.settings
~/ MedeA
|
Perform a custom installation without installing the JobServer and TaskServer. You will need to get a license for the new machine.
If you have some custom additions to MedeA, you should copy the environment settings from your home directory, abbreviated as ~, to the home directory on the new machine. On Windows just open a command shell (prompt) and type %HOMEDRIVE%%HOMEPATH% to find this directory, which is normally C:\Documents and Settings\<Username>. On Linux the command cd or cd ~ take you into your home directory.
1.11.2. Installing Another JobServer
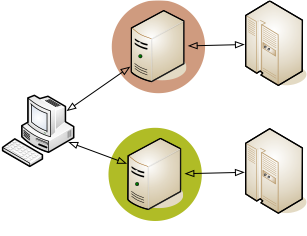
Adding another JobServer involves all three tiers as the JobServer is the central piece of the MedeA installation. The JobServer talks to the graphical front end and the TaskServers. The installation process is split into two parts, first to add and test another JobServer without interrupting the running JobServer. The next section will deal with replacing an existing JobServer.
Warning
Do not connect two or more JobServers to the same TaskServer. This should be a temporary solution for testing purposes as this can result in files being overwritten and corrupted.
| GUI | JobServer | TaskServer |
| Install from ISO: JobServer | ||
| Add new JobServer to Preferences | Name/IP-Address | |
| Create Queues | ||
| Attach TaskServer | Name/IP-Address |
During the custom, installation select only JobServer and perform configuration as a service.
Create queues and attach TaskServers as described in section Working with Multiple Queues Adding additional MedeA Queues
Add the new JobServer via File>>Preferences>>Job Servers.
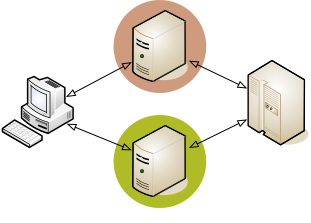
Replacing the JobServer
When planning to replace an existing JobServer, the previous procedure creates a new JobServer, but it leaves the need to transfer the already computed results to the new JobServer to have all computed results in one central place.
| GUI | JobServer | TaskServer |
| Install from ISO: JobServer | Install from ISO | |
| Add new JobServer to Preferences | Name/IP-Address | |
| Create Queues | ||
| Attach TaskServers | Name/IP-Address | |
| Import Jobs: Maintenance | ||
| Delete old JobServer in Preferences | Name/IP-Address |
During the custom installation only install: SQL, JobServer, and Configuration as a service .
Duplicate your existing JobServer by creating the same Queues and attach the existing TaskServers. You can rename and change settings based on the experience gained in the meantime.
You can use the maintenance tool to import the Jobs to the new JobServer, provided the Job directory is accessible to both machines, for example by sharing the directory on the local network.
The imported Jobs have to be attached to a queue - this is done with the web interface of the JobServer.
After testing and transferring you can remove the entry of the old JobServer from File>>Preferences>>Job Servers.
The Job directory still contains all the calculated results - delete only after verifying that the import worked exactly as planned.
1.11.3. Adding More TaskServers

| GUI | JobServer | TaskServer |
Install from ISO:
TaskServer
|
||
| Add TaskServer | Name IP-address | |
| Attach to Queue | ||
| Adapt Queue_Template.tcl |
A new TaskServer can also be added using the MDMaintenance program. Click Manage Daemons, then add a Queue name and User and click Add TaskServer and Queue.
To add a TaskServer from ISO and create the service.
If feeding into a batch system, adapt the respective queue (batch) script.
Finally add the TaskServer to the list of TaskServers known to the JobServer and attach to selected Queues.
| download: | pdf |
|---|