1.4. Installation from ISO
Contents
- Mounting the ISO File
- Installing MedeA
- Standard Installation
- Custom Installation
- Installation Progress
- Creating Links and Shortcuts
- Setting up JobServer and TaskServer as Services
- Verify Automatic Start of Services on Linux
- Check Firewall Settings and Allow Connections for JobServer and TaskServer
- Check System Limits
- Installing TaskServer/s on Multiple Machines
| download: | pdf |
|---|
1.4.1. Mounting the ISO File
If the provided ISO only contains the ISO file MedeA_2.22.6.iso. You will need to mount the ISO file onto your computer to access the installer.
To do this on Windows 8 or Windows 10 right-click on the ISO file and select Mount. On Linux run
sudo mount -o loop ISO_file ~/Downloads/
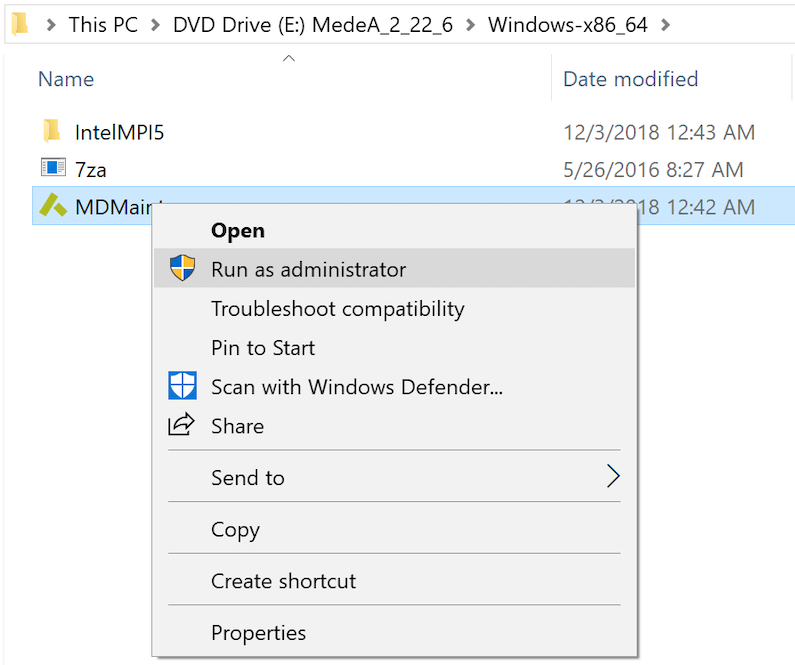
to mount the ISO_file (MedeA_2.22.6.iso) into your Downloads folder. Once the ISO file is mounted you can navigate the appropriate folder, Linux-x86_64 or Windows-x86_64 and run the MDMaintenance program as an administrator to access the installer.
1.4.2. Installing MedeA
The MedeA installer will guide you through the installation process which will take some minutes. You will see progress updates and warnings if your system needs some changes to run some of the provided codes. At any time, you can scroll back and forth within the installer message window to inspect the individual steps of the installation.
Hint
Windows: Start the Installer as Actual User
Insert the MedeA ISO (or mount the ISO file) to auto start the MedeA Software manager. In case the Software manager does not start automatically, go to the mounted ISO drive, then into the Windows-x86_64 directory to locate MDMaintenance.exe.
Right-click and select “Run as administrator”.
Hint
Linux: Start the Installer as Administrator
Create a user medea.
Log on as user medea and create the installation directory mkdir ~/MD
You might need to install libXScrnSaver, net-tools or similar packages missing from your distribution1.
Run Linux-x86_64/MDMaintenance.x from the top level of the ISO and select /home/medea/MD as the installation directory.
Hint
Alternative on Linux: Start the Installer as Actual User (with sudo Rights)
(As administrator) Create a user medea and give this user sudo rights.
Log on as user medea and perform the installation:
Run Linux-x86_64/MDMaintenance.x from the top level of the ISO
MedeA on Windows and Linux look and behave the same way. So, unlike many Linux programs, the entire MedeA distribution is in one folder, including databases, executables and generated results. The location of temporary files can be changed any time; the best place is to install in a directory owned by the actual MedeA user or group.
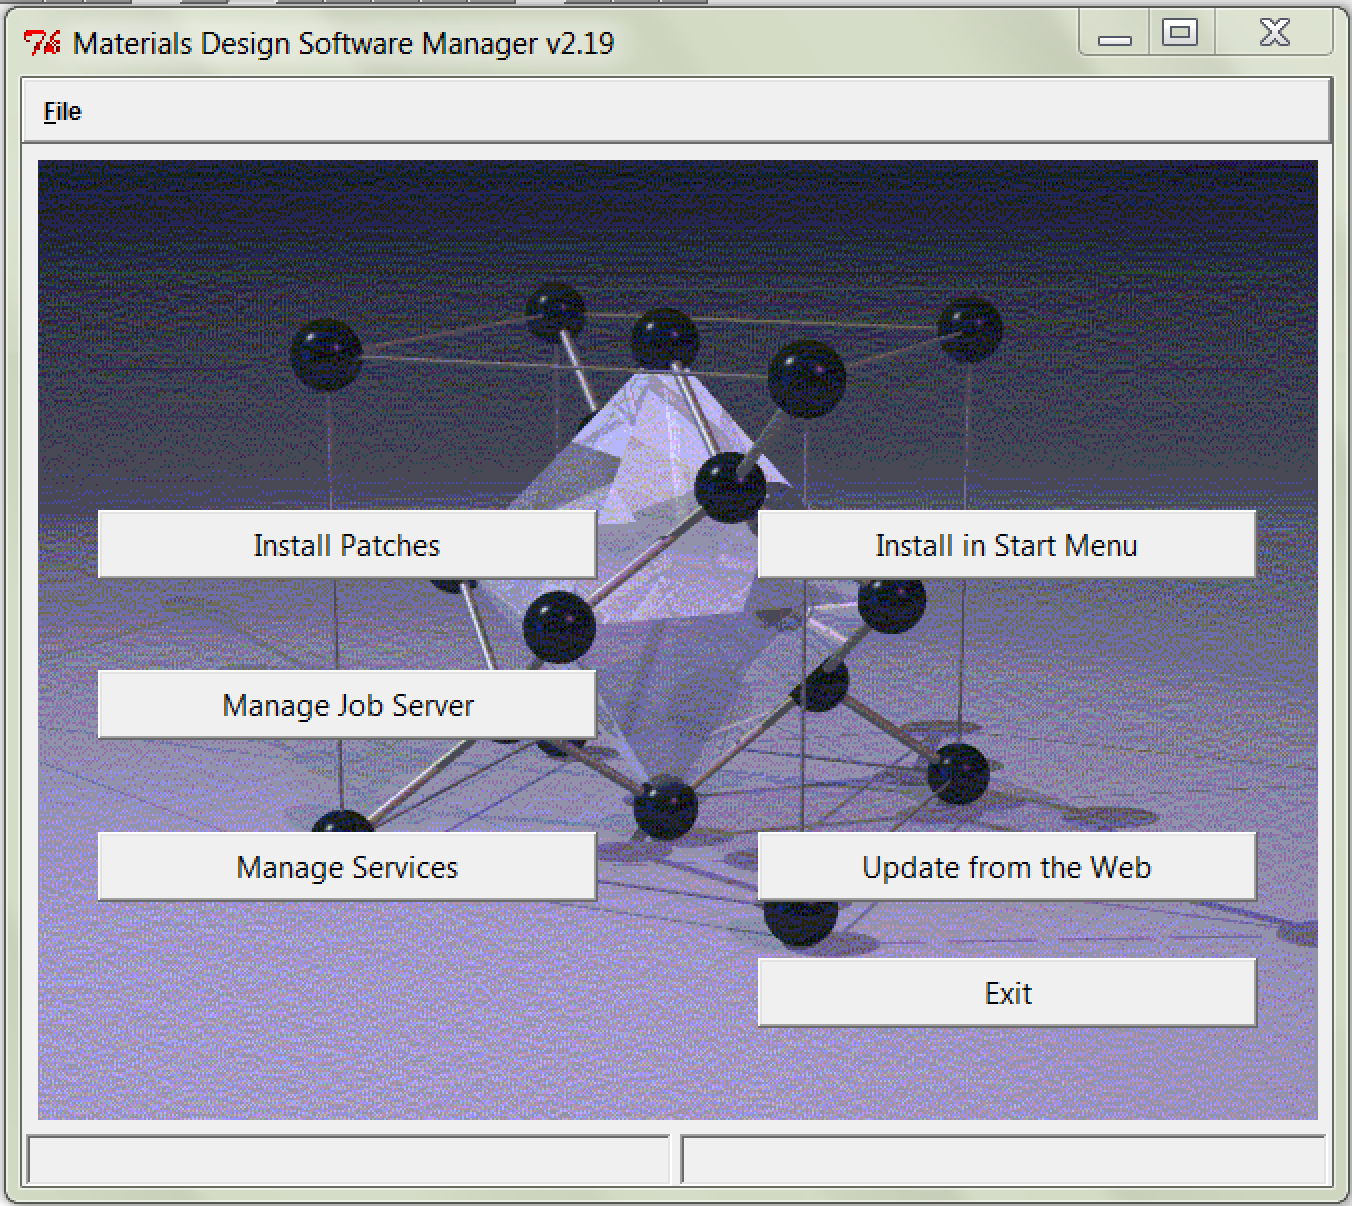
Once you have MDMaintenance running click Install MedeA Software to continue and select the installation mode standard installation or custom installation. Please note that the actual size of packages and databases changes with each update and depending on the specific databases present on the ISO.

1.4.3. Standard Installation
The standard installation provides default paths and installs all components from the present ISO. Note that Standard Installation will select C:MD on Windows or ~/MD on Linux.
The drive or partition you select for MedeA should have at least 20 GB available for storing results of calculations performed with MedeA.
Hint
On Windows, you cannot install on a user drive, which is unmounted after logging out.
1.4.4. Custom Installation
If you would like to change the MedeA installation or select specific modules for installation, select Custom Installation. Keep in mind that for maintenance it is best to have the whole MedeA program tree, database files, and Job data on a single hard disk partition.
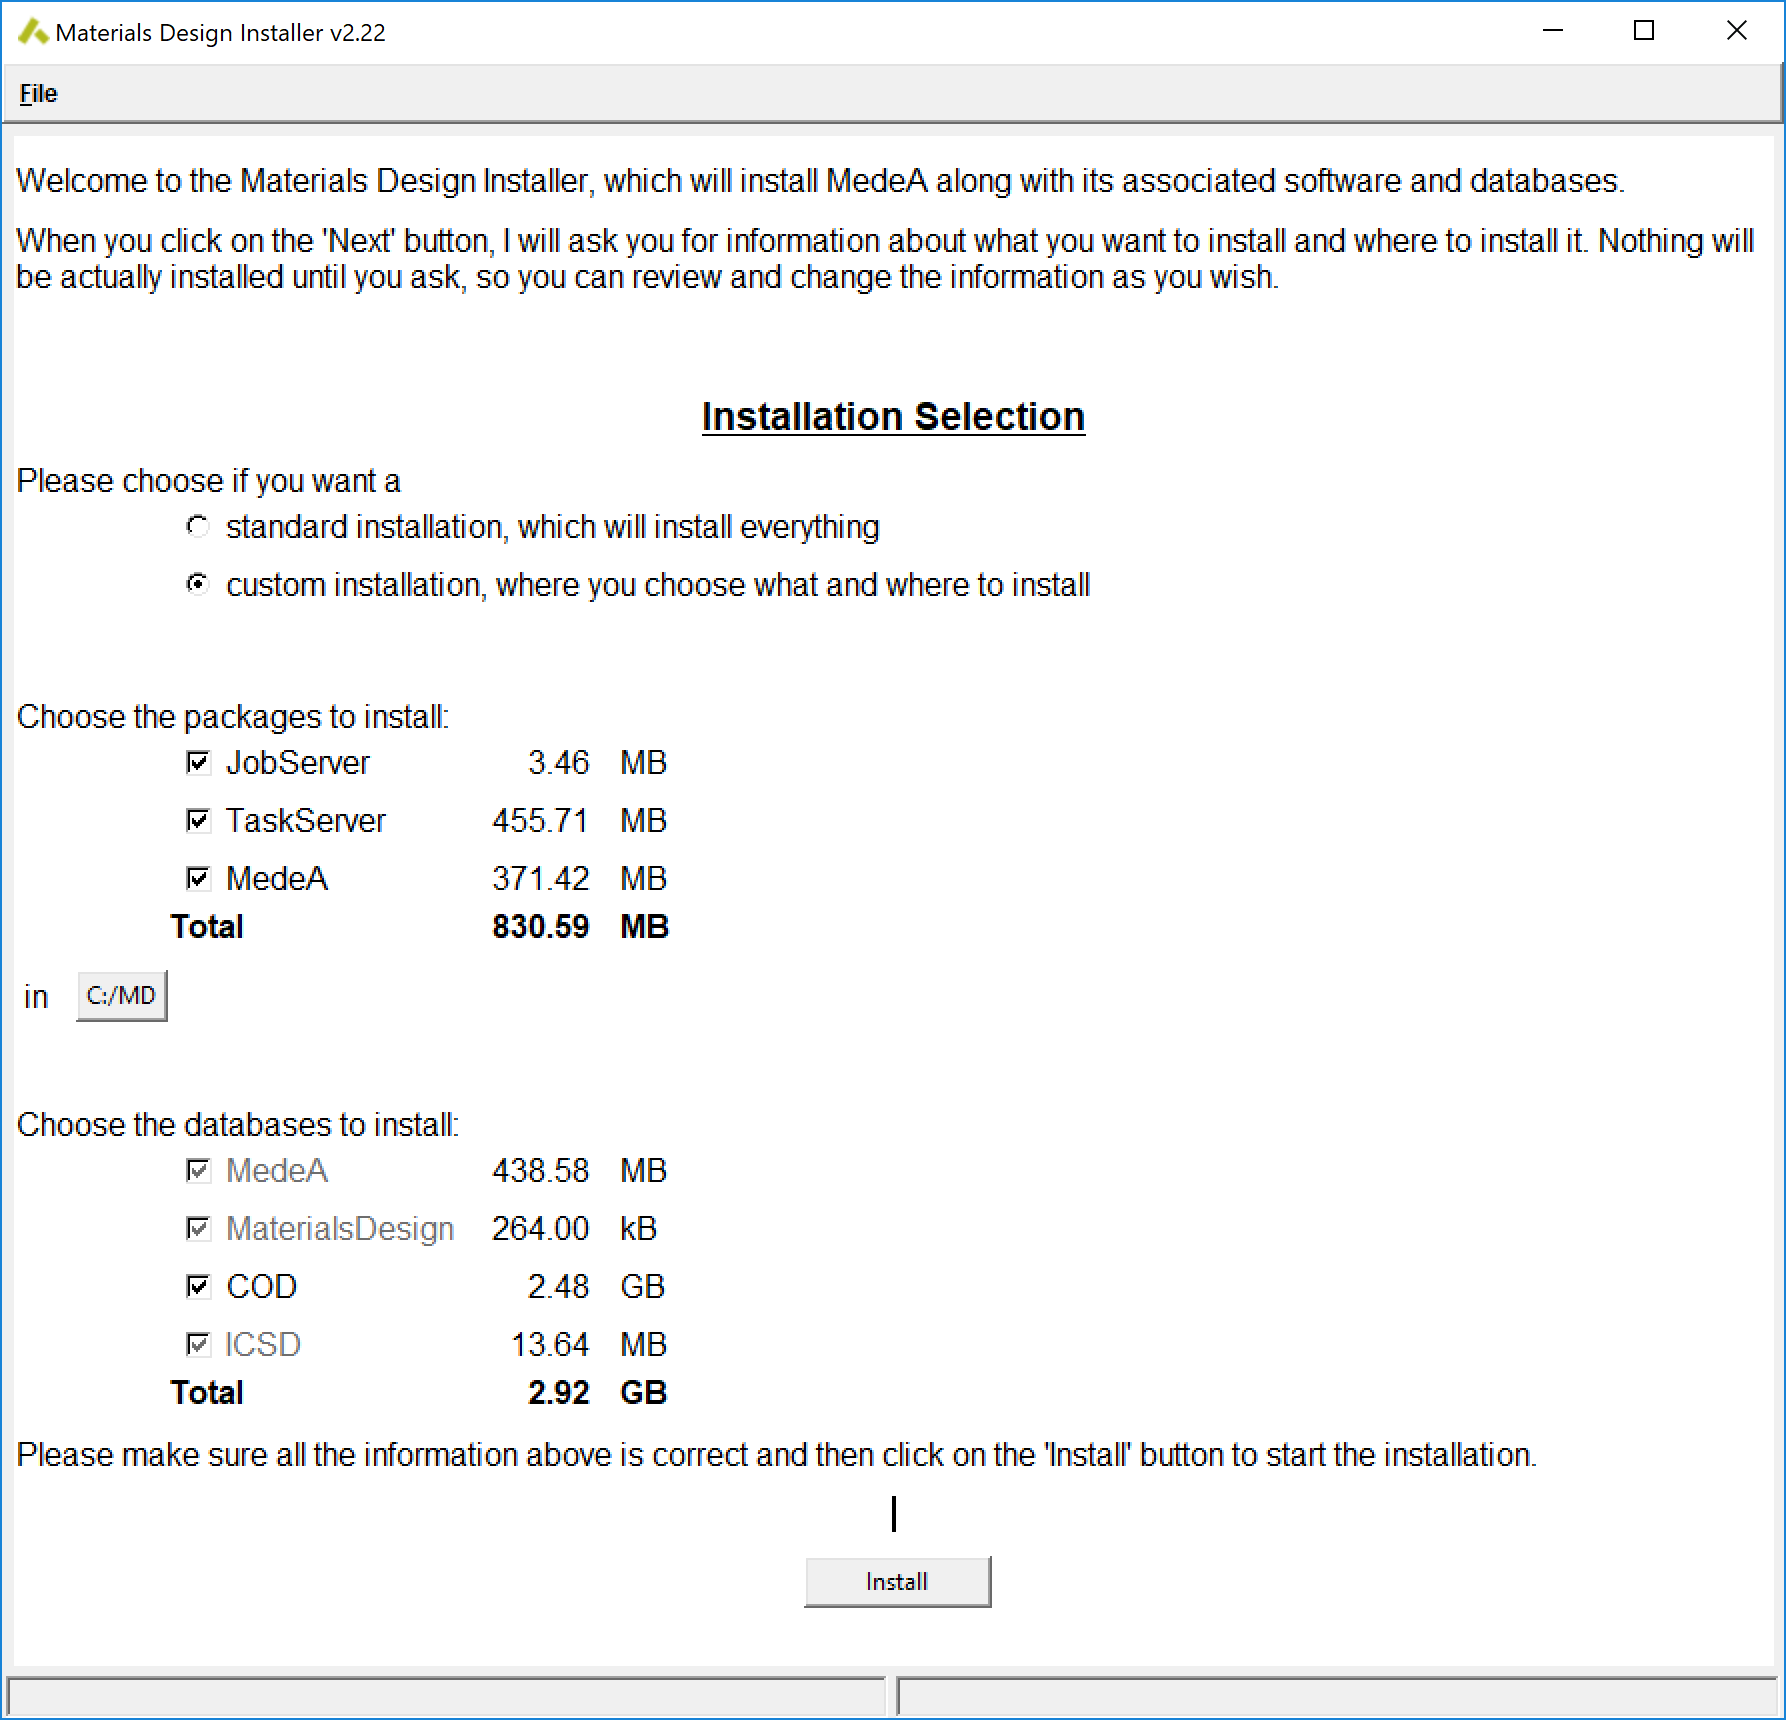
- Click Install to continue
1.4.5. Installation Progress
In the next step, the MedeA installer will install all the selected MedeA components:

Make sure you scroll down to the very bottom of the installer window to see the latest messages. If you activate other windows while installing, the installer window may turn blank for some time before displaying an updated status. Once all components are selected, the Installation Progress in the installer window displays the current status, followed by done for the successful installation of each component.
1.4.6. Creating Links and Shortcuts
Hint
On Linux you might see a request for your sudo password unless you install as administrator: Your password will not be shown (it appears as ******). Click on the Check button and it turns into an inactive OK button if the password is correct and you have sudo rights. Otherwise, you cannot install shortcuts for all users.
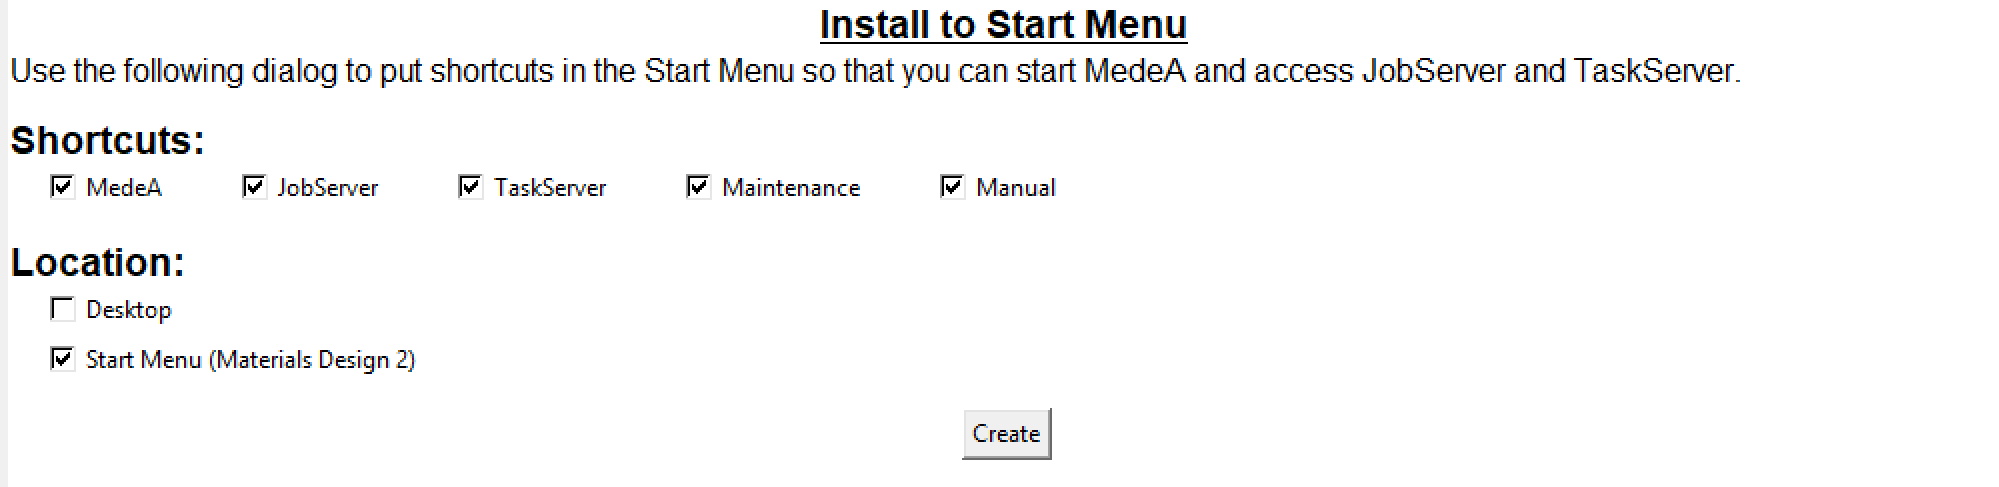
In this step, the installer will create shortcuts and Start menu entries for MedeA. Please make sure to create the start menu entries (default), as this will later be used to configure and update MedeA.
- Click Create for and you proceed to the next section.
1.4.7. Setting up JobServer and TaskServer as Services
In the next installation step, you will be asked if you would like to configure the JobServer and TaskServer as system services to start automatically during the boot phase. In order to run calculations or look at results from calculation in your browser, you need to start these processes.
We strongly recommend that you install and run these processes as system services. You can also run them as scripts, via Start menu >> All Programs >> Materials Design 2 >> debugJobServer / debugTaskServer on Windows. On Linux these two programs are located in MD/2.0/JobServer/debugJobServer and MD/2.0/TaskServer/debugTaskServer.
1.4.8. Verify Automatic Start of Services on Linux
Use your Linux distributions’ administration tools to verify that JobServer and TaskServer will start automatically after reboot.
Check that Mdjobserver (if Installed) Starts Automatically
On RedHat systems the following commands are important:
chkconfig --list mdjobserver
mdjobserver 0:off 1:off 2:off 3:off 4:off 5:off 6:off
In this case, the mdjobserver is not going to start automatically. Let’s change this for run levels 3 and 5:
chkconfig --level 35 mdjobserver on
chkconfig --list mdjobserver
mdjobserver 0:off 1:off 2:off 3:on 4:off 5:on 6:off
Check that mdtaskserver (If Installed) Starts Automatically
chkconfig --list mdtaskserver
mdtaskserver 0:off 1:off 2:off 3:off 4:off 5:off 6:off
In this case the mdtaskserver is not going to start automatically, change this for runlevels 3 and 5:
chkconfig --level 35 mdtaskserver on

chkconfig --list mdtaskserver
mdtaskserver 0:off 1:off 2:off 3:on 4:off 5:on 6:off
On SuSE use the runlevel editor of YaST. With Debian, Ubuntu, and Gentoo the installation of system services is part of installing mysqld.
1.4.9. Check Firewall Settings and Allow Connections for JobServer and TaskServer
If you have a firewall in place, make sure that the TaskServer can be reached from the JobServer. With iptables in place, the port can be opened with the following commands.
iptables -I INPUT -p tcp --dport 23000 -j ACCEPT
You can restrict access to the TaskServer to a single JobServer by specifying a network address:
iptables -I INPUT -p tcp --dport 23000 -j ACCEPT -s <IP of JobServer>
Check the current set of rules in place - and please talk to your IT department:
iptables --list
Chain INPUT (policy ACCEPT)
target prot opt source destination
ACCEPT tcp – anywhere anywhere tcp dpt:23000
To keep the set of rules working after the next reboot, you need to save them. This depends on Linux version and specifics of your installation like RedHat/Centos/Fedora.
/etc/init.d/iptables save
Similarly, you need to allow access on the JobServer from your GUI:
iptables -I INPUT -p tcp --dport 32000 -j ACCEPT
1.4.10. Check System Limits
Depending on model size and type of calculation, VASP and LAMMPS calculations can demand considerable amounts of memory, especially when running in parallel across many compute nodes. Please check whether the following properties are large enough, you can use ulimit -a in bash:
- fsize: maximum file size: should be unlimited
- memlock: maximum locked-in memory: 80-90% of total main memory
- rss: maximum memory size: should be unlimited
- nofile: number of open files: at least 20 per core
- stack: (memory) stack size: 80-90% of total main memory
- cpu: cpu time that can be used: should be unlimited
- nproc: max. processed per user: set to at least 1000
- as: virtual memory: should be unlimited
- Locks: file locks: should be unlimited
Modify /etc/security/limits.conf to raise the impinging limits, here are examples:
# End of file
* soft memlock unlimited
* hard memlock unlimited
* soft nofile 10240
* hard nofile 10240
* soft nproc 3153919
* hard nproc 3153919
Hint
You can replace * with medea to limit those changes to the TaskServer running as user medea. Remember to restart the TaskServer to use the changed limits.
1.4.11. Installing TaskServer/s on Multiple Machines
For configurations with multiple TaskServer/s you have to repeat the TaskServer/s installation on each machine:
- Perform a Custom Installation in case you want to change the installation path; otherwise the Default Installation.
You can keep your MedeA installation up to date using the installed maintenance program (MDMaintenance) to update from the web. This will download the current version of modules and codes.
| download: | pdf |
|---|